Tuesday, August 25, 2015

LF: Tank You!

Lawn Fawn - Fintastic Friends, Lawn Fawn - Stitched Journaling Card die, Lawn Fawn - Stitched Scalloped border die, Lawn Fawn - Mint Line Dance 12x12 paper, Lawn Fawn - Navy Notecard, Copics, Enamel Dots

Thank you for hanging in there with me so patiently as I move through another busy work week!

I promise, more cards are on the horizon. :)

Thursday, August 20, 2015

TGF: Evie

I've had (and continue to have!) a rather busy work week, and I'm not finding much time to be creative or a witty blog writer. So, please excuse my quietness and bear with me for a bit longer.

So, today's card will be a super quick share. It features the Evie stamp from The Greeting Farm's Secret Stamp Club. I colored her in with Copics, and paired her with a fun patterned paper from Bo Bunny. I added a sentiment from Paper Smooches, and a few enamel dots to match up both the character and the patterned paper colors.

Thanks for reading!
~Elle~

Monday, August 17, 2015

Nerdy Tia


It's time for another fabulous new release from Some Odd Girl!

Last time, we had the adorable Tobie in his smart school clothes, and this time it's Tia that's joining in! Nerdy Tia is a perfect stamp for celebrating school, learning, or anything that's clever and smart.

I started by printing Tia out onto some Copic X-Press it cardstock. I colored her in with Copics, going for a bright and cheerful palette. Once I was done, I carefully cut her out with scissors, leaving a small white border.

I dipped into my stash of patterned papers again and found a fantastic plaid paper as well as a white notebook-inspired paper. I trimmed the plaid paper to be slightly smaller than the standard A2 card base (top-folding 4¼x5½") and die-cut the notebook paper with a stitched circle die.

I layered the papers together and adhered them to a Kraft card-base. I added Tia with foam squares.

For my sentiment, I die0cut a couple of word dies with yellow and red cardstock. My color inspiration was pulled from the colored image (yellow pencil and red tie). I adhered them above Tia.

As a last touch, I added a few blue enamel dots next to Tia, just to pull in some more of that blue color.

Be sure to check out the amazing projects the rest of the Oddie Design Team created!

Thursday, August 13, 2015

Make your own Card Kit 1

Every now and then I get a cleaning/organizing bug. I find myself going through my crafty supplies in an effort to make them easier and more convenient to use. And it really helps! Seeing everything I already own is a great reminder that I might not need the 30 shiny new stamps that were just released.

The last thing I organized was my card kits. I only get one card kit per month (from Simon Says Stamp), but it still stacks up over time. Originally, I simply left the kits in the box they came in and stacked them in the corner of my crafty closet, with a label on the side. However, this wasn't ideal because I'd forget what was in each kit and that meant I used them less. So, I started switching them to big ziploc bags.

The clear bags were a better solution, as I could see the stamp set, embellishments and colors of the kit much easier. It still wasn't ideal, though, because I still often forgot to look through the kits when I was searching for the perfect card supplies.

So, my latest organizing idea was to leave the last 3 months of card kits in ziploc bags, and put the rest of it away with my other supplies. So, stickers went with stickers, washi tape with washi tape, stamps into their pockets and stored with the rest of my stamps, and so on. So far, I'm liking this system much better, as it's giving me a chance to break out of the kit-only box and use the supplies more.

While doing this organization project, I felt really inspired to try my hand at making my own card kit. I figured this would be a great way to fine-tune my planning and design skills, as well as inspire me to use up some of my ever-growing supply stash.

Here are the contents of my very first kit and how I went about putting it together.

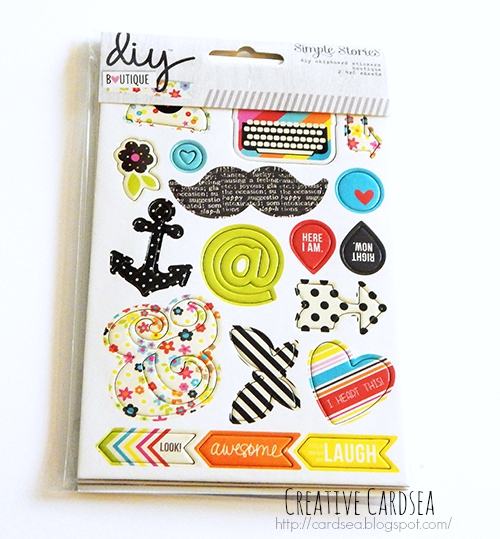
I think every kit needs to have a launching point of some sort -- whether that's a product, color scheme or topic/theme. I decided to start with this chipboard sticker set from Simple Stories DIY Boutique line. I've had this sticker set for a while and kept wanting to use it. But it never fit entirely in the card I was making, so it just sat there in my stash. I thought I might have a better chance of using it if I built a kit around it.

I chose the paper quite randomly, going for colors and tones that matched the stickers. Some papers were from the same line as the sticker, but the majority were simply from  my stash. I did not try to match the colors exactly, instead I went for choosing colors that had the right brightness and tones.


And that's a close-up of the different papers I chose. Since the sticker had a creamy off-white background, I chose to go with similar tones for the white.


Next, I prepared a few card bases that fit the tones of the patterned paper and sticker. These bases are already cut and folded into A2-sized cards (4¼x5½").

The first part of embellishments was a set of enamel dots. I grabbed the bright enamel dots from Freckled Fawn, as well as a black/gray and gold sets of enamel dots from Studio Calico. The colors of the enamel dots are not the exact match to the other supplies, but they do stand out great against the patterned paper I chose.

The second part of the embellishments was dipping into my wood veneer and button stash. I found some fun wood veneer and buttons in the same tones as the papers. I also grabbed a couple of flair, some black satin ribbon and a rainbow washi tape.

The last step was getting a few stamp sets that go along with the rest of the kit.
Since I like coloring, I grabbed two stamp sets that I could color. On the left is Evie from The Greeting Farm secret stamp club. On the right is Some Odd Girl's Hipster Mae. Both of them seem to fit the modern hipster vibe I got from the chipboard stickers.

Next, I grabbed a couple of stamp sets that are a little bit funny. On the left is Stuck on This from the Sweet Stamp Shop (now retired, sorry!) and Paper Smooches' Teen Routine is on the right.

Since there was a mustache on the sticker pack, I thought it might be good to add in a masculine stamp, so I chose Terrific Ties from My Favorite Things.

Lastly, I wanted to make sure that I had some good sentiments to work with, so I chose two stamp sets from Simon Says Stamp - Stripe Greetings on the left and Big Scripty Greetings on the right.

And that's all there is to this kit! I will be sharing the cards created with this kit as well as my thoughts about how well (or badly!) it worked for me soon.

Until next time... Thanks for reading!
~Elle~

Tuesday, August 11, 2015

Guest Duo

I've got not one, but two cards I'm sharing over on the Some Odd Girl blog today!

Check them out and let me know what you think! :)

~Elle~

Saturday, August 8, 2015

OHC - Weekly Round Up #3

It's time for another weekly round-up of the cards I've created for my OHC challenge!

OHC 93 - Watercolor:


C.C. Designs - Patty (retired), Akashiya Sai watercolor brush pens, Ranger Distress Inkpads- Cracked Pistachio (background)

I kept this card pretty simple and went all out with sequins as embellishment. I think they fit the stamped stars and dots just perfectly.

OHC 3 - Forever:
My Favorite Things- MSTN I love you more stamp, Blueprints 15 die; Lawn Fawn - Hearts die; Kaisercraft - Cherry Blossom 6.5x6.5

I wanted to play with some patterned paper and negative die-cuts with this card. I also echoed the dots in the paper with some enamel dots as embellishment.

OHC 58 - Feminine:
Simon Says Stamp- Lovely Spring, Pretty Pink Posh- Sparkling Clear sequins, Ellen Hutson LLC- Peach sequins

This card was really difficult to photograph, as the colors are pretty light and subtle. I went for a combination of warm pinks and browns, with a touch of light green. I also brought in some peachy colors and sparkle with sequins.

OHC 10 - Nostalgia:
My Favorite Things- BB Adventure Is Calling, Copics

I colored this Birdie Brown stamp with very bright, summery colors. I added the cute bunny from the set next to the sentiment, and I think this really dressed up the sentiment panel.

OHC 46- Brown
My Favorite Things- BB The Whole Herd, Lawn Fawn- Chit Chat (w/ coordinating dies), Lawn Fawn- Let's Polka Mon Amie paper, Doodlebug Sprinkles Chocolate vellum

This is a pretty simple birthday card. I played with different shades of brown and colored in a cute goat from Birdie Brown.

And that's all for this week!
This week's been really busy, so I didn't get a chance to get crafty a whole lot. But I'm hoping to catch up next week with more projects to share.

Thanks for reading!
~Elle~

Thursday, August 6, 2015

TGF-Willow


 Today's card is a simple card using one of the The Greeting Farm's secret stamp club stamps -- Willow. Willow is another cute girl from the charming witch school line. I'm getting to have quite a collection of these!

I stamped Willow in black hybrid ink onto some marker paper, then colored her in with Copics. I kept the coloring really simple and mono-chromatic. I went for a more natural hair color (black) with a rebellious purple streak and teal for her uniform. Once she was done, I carefully cut her out with a pair of scissors, leaving a small white border.

I wanted to echo the colors of her outfit, so I chose a starry patterned paper that matched it. I die-cut it with a stitched rectangle die. Then I grabbed a neutral polka-dot paper and die-cut the same rectangle. I used a stitched scallop border die to trip the star paper and then I adhered the two together. This gave a bit of extra contrast I felt the card needed.

I adhered the paper to a white top-folding A2 white card (4¼x5½") using foam squares. I added Willow (also on foam squares). For the sentiment, I used a cute sticker I found in my stash and a few purple enamel dots.

Thanks for reading!
~Elle~

Tuesday, August 4, 2015

Sneak Peek -- Masculine card


I'm tackling a simple masculine card over on the Some Odd Girl blog today! I'd love if you could take a quick peek. :)

Monday, August 3, 2015

Geeky Tobie


 Today's card features a brand new digital stamp from Some Odd Girl -- Geeky Tobie! Tobie looks really smart and studious in this stamp, which is great for all those school projects. From cards to notebook decorations, I can see Tobie's smiling self fitting in just perfectly.

For my project, I chose to go with a card - something that I can give to a teacher once school starts.

I started by printing out and coloring Tobie with my Copics. I carefully cut him out with scissors, leaving a small white border.

Then I dug into my school-themed papers (I have a ton!) and pulled a couple of fun papers. Since Tobie's got a calculator, I used a bright number paper as my backdrop. Then I die-cut a composition notebook cover paper into a banner shape and trimmed it down to size.

I adhered the papers to a medium gray card base (top-folding A2 size - 4¼x5½"), then added Tobie with foam squares. As both papers are quite busy and vibrant, I chose to minimize embellishments and added just a few enamel dots near Tobie.

Since this card was going to a teacher, I chose to leave the sentiment out. Instead, I added a chipboard button with "A+" on it. This way, the teacher can use it for a variety of occasions and write a fun personalized message inside.

Head over to Some Odd Girl blog to see what the other designers created with Tobie. Their projects are awesome and super inspiring!

~Elle~

Saturday, August 1, 2015

Weekly Round-Up (OHC) 2

It is Saturday, and it's time for another weekly round-up of the cards I created for my OHC challenge!

As you may have noticed, I did not post too many cards this week. In part, it was because the majority of my cards were OHC and I wanted to save them for my round-up. The rest was split between having some guest designer projects (really awesome things coming from Some Odd Girl!) and work keeping me very busy. I've managed to (barely) find enough time for my daily creative hour, but not enough to take photos and make fun posts about it.

The next couple of weeks are likely to be the same, but as the OHC to-make list starts to dwindle, I anticipate a lot more cards being shared.

Now, onto the cards~

OHC 17 - Dream
 The Greeting Farm- Cuddly Thanks, Clearly Besotted- Say It In Style, Copics

OHC 85 - Mint

Mama Elephant- Ella and Friends, Mama Elephant- Photobomb (sentiment), My Mind's Eye On Trend 6x6 paper, Copics

Note: The patterned paper is mint, even though it doesn't fully look like it in the picture.

OHC 34 - Summer

Stamping Bella- IDA Lulu (retired), Prismacolor pencils, Papertrey Ink Wet Paint Cuts Die (hello)

OHC 96 - Thanks

Simon Says Stamp- Sailing (July 2015 Card Kit), My Favorite Things Blueprints 1 die, Copics

OHC 14 - Alone
WPlus9- Happy Mail, Copics

OHC 21 - Velocity
Avery Elle- Roll With It (retired?), Lawn Fawn- Let's Polka flair

OHC 80- Country

Dare 2B Artzy- Lemonade, Pink Paisley- Citrus Bliss 6x6, Copics